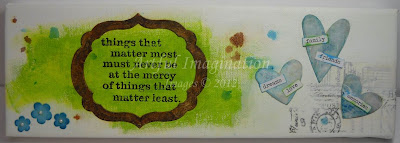
Even though most of my projects normally use more than one medium, such as paper, ribbon, ink, or metal, I have never really considered them to be "mixed media" pieces. They are cards, scrapbook pages or 3-D projects. To me, mixed media is all the other stuff. The items that are too heavy for a card or page, the pieces of junk laying around from other crafting or household projects. The products you purchased to work on a specific project and now can't believe you bought, or even remember what you were going to do with it. These things can be torn, broken and altered to work in mixed media pieces, along with all your favorite items.
I found some wonderful odd sized canvases on sale recently and bought a few. I sometimes struggle with the squareness of the most popular style.:) This one is 4" x 12" and was perfect for what I had in mind.
I LOVE the quote; and it is in stamp form-sweet! It's become my mission statement over the past few months. Even though I had an idea, I wasn't quite sure how I was going to execute it so there was a lot of trial and error to complete this project.
First I prepared the canvas by covering it with a layer of white Gesso. The green background is a mix of green paints and reinker, as well as a little yellow reinker. Once I reached the desired color, I dry brushed it onto the canvas. For the splatters, I took Broken China Distress Stain with a q-tip and Vintage Photo Distress reinker with the eyedropper from the bottle to place spots where I thought they looked good. It took a couple of tries, I wiped off and painted over some with white acrylic paint.
I stamped the quote with Black Archival ink and then covered the entire piece with Glue and Seal.
For the hearts, I glued some scraps of paper from the Vintage Shabby Paper Stash on a thin piece of cardboard. It was actually the cardboard sheet that comes in the DSP packages from SU, and cut them out with the movers and shapers Mini Heart die. I inked the edges with Broken China Stain and Silver paint and then sealed them. I inked up words of things that matter to me, from Tim Holtz's Chitchat stickers and then placed them on the hearts.
After I placed the tissue tape on the canvas with the Glue and Seal, I lightly covered it with some white acrylic paint, wiping off where it covered too much. I then sealed the hearts unto the canvas. One nice thing about the Glue and Seal is that it doesn't take very long to dry. If you are really impatient, like me, you can use your heat gun to help it along.
The frame is SU watercolor paper. I cut the shape using the Label framelits. I first inked the piece with Vintage Photo Distress Ink, then randomly covered areas with Gold Dabber paint. It looked too bright so I added some Tarnished Brass crackle paint and once that dried I rubbed in some Black Soot Distress Ink using my finger.
The paper flowers were colored using Broken China Stain and self adhesive pearls were used for the centers. Again, I used Glue and Seal to adhere the frame and flowers to the piece. The entire canvas received one more coat to seal everything giving it a durable finish. And that was it. It took me WAY longer to design the piece than to get everything on there once I decided what I wanted.
I really like how it turned out. What do you think?
Supplies
Ink: Broken China and Peeled Paint Distress Stain, Black Soot, Squeezed Lemonade, Mowed Lawn, and Vintage Photo Distress Pad and Reinkers (Time Holtz), Black Archival (Ranger)
Paint:Silver and Gold Dabber (Ranger), Tarnished Brass Crackle, (Tim Holtz), Key Lime (Making Memories), White Acrylic (KaiserCraft)
Paper: Vintage Shabby Paper Stash (Tim Holtz)
Stamp: Matter Most (Stampers Anonymous-Tim Holtz)
Misc.: Basic Pearls, Labels Collection Framelits, (Stampin' Up!), Floral Embellishments (Recollections), Movers and Shapers Mini Heart Die (Sizzix-Tim Holtz), Nostalgic, Journyman, and Symphony Tissue Tape, Chitchat Stickers (Tim Holtz) Glue and Seal (Ranger), Canvas, Gesso (Local Craft Store)


