Pages

Showing posts with label 3-D. Show all posts

Saturday, November 22, 2014

A Picture Post

Wow, hard to believe another year is almost over, or that it has been almost a year since my last post.  Since there are so many projects I have been working on this year and haven't shared, I thought I would make this post mainly pictures.

There are so many new and fun products on the market, and I want most of them, but I've officially run out of room.  So, I've been very selective on what I have been purchasing lately and trying to use up the items that I have in my stash along with a few newer items.  Many of the projects pictured include retired SU product as well as newer items.


 My niece's wedding invitations and thank you cards. (sorry for the crummy pics)


The pictures don't do these justice, they were gorgeous in-person.  The colors are very vibrant and rich.

Cards


Tags


3-D items


Craft Fair items


These adorable snowmen, I just finished today and gave them to a good friend as a birthday present.  She collects snowmen. :)


They are made from mattress springs.  I saw these and decided to try and make them myself.  There were no instructions with the ones I saw so it was a bit of trial and error.  You would think they would be pretty self explanatory and easy to do, but not so much for the first one, or two.

You need some good industrial wire cutters to get those springs out and cut.  You also need a vice to bend the top of the spring in to get those little heads to be even and not slanted.  Hot glue is your best friend when making these.

I covered the styrofoam balls with liquid glue and then covered that in epsom salts.  I let them dry overnight before doing anything else. 

This is a great repurposing project.  The scarves are made with fabric from an old jacket.  I used retired Stampin' Up! buttons, but you could easily use buttons from an old shirt and old jewelry/gems for the face.  I used a combination of brads and large pearls for mine.


 Hope you have a wonderful day!

Kym

Saturday, December 1, 2012

Paper Scraps and Craft Shows

If you're like me, you have a nice little stash of paper scraps.  Well, in my case it's a rather large stash.  As you may have read in previous posts, it's an ongoing challenge for me.  I will get it cleaned up and organized and then when I start getting into craft fair mode or making larger projects, it just takes on a life of its own.

This year I was a little better about putting together projects were I would use up more of the scraps, or better yet, not have as many to add to the pile.

These emery board holders make great little stocking stuffers and sold really well at the craft fairs.  And, I was able to use up a bunch of scraps on the embellishments and even the holders as well.  I saw the idea on this blog a while back, but this is the first time I have made any.  Very simple and easy to do.


The paper for the holder measures 3" by 5",  On the 5" side score at 1/4"; on the 3" side score at 1" and 3".  Fold and seal.  I used a 3/4" circle punch to make the half circle cut-out at the top. 


The next item is a money/check holder.  The inspiration came from this.

The finished outside holder measures 3 1/4" x 7 1/2", and the inside slider measures 3 1/8" x 7 1/2".  You could trim the slider down to 7 1/4" tall, but I like out it peeks out of the top a bit.


I used SU's slit punch (retired) on the bottom of the slider.  Coupled with the circle at the top, the money or check will stay securely in place.  I added a piece of card stock on the back of the slider piece so that a message could be added for the recipient.


I was able to use up more scraps for the embellishments on these.  They were also a big hit at the craft shows.

When I wrote this post and added the link to the inspiration pic for the money holder, I was not able to access the blog anymore that she mentioned had the directions.  I will post a tutorial later this week.

Hope you all have a great day!


Tuesday, May 22, 2012

Baby Shower Ideas

This past week I worked on some Baby Shower favors and centerpieces for a co-worker's daughter.  We had and extremely tight budget to work with so it was definitely an experience.

The favors were straightforward enough and turned out pretty cute-I think.  Pastel was the color theme of the party and they know the baby is a girl.    They are so excited. :)  After showing my co-worker some samples of what we could use for the favor boxes, she settled on the Fancy Favor Box {one of my favorites}, with pink and white as the colors.


I used the the two smallest dies from the Label Collection Framelits to cut out the little hand print from Baby Prints and the mat behind it.  By using the stamp set in the clear mount version, I was able to position the stamps on the block so that I only had to stamp once on each of the boxes.  It was much easier and quicker than going back and forth between stamping "it's a" and then "girl".

The hand print and words were stamped in Blushing Bride and the mat framelit piece was also sponged in the same color.

Stamps: Baby Prints 
Paper: Pink Pirouette, Whisper White
Ink: Blushing Bride
Misc.: Label Collection Framelits, Fancy Favor Box Die, Big Shot, Clear Mount block E, Sponges


The centerpieces ended up being a bit more challenging.  One of the original ideas I had shown her was this topiary set I found on Social Couture.  However, after pricing out the number of vases needed, and surprisingly the cost of styrofoam balls, I was going to be WAY over budget.  So, my friend Valerie pointed me in the direction of this tutorial  from Evelyn Kate Designs.  It was a hit with everyone, so off I go to make 20 centerpieces.  Yikes!!  Who knew paper flowers could get so involved. :)

Large Topiary ~ a little over 12" in diameter


Medium Topiary ~ about 8" in diameter


Small Topiary ~ between 5" and 6" in diameter


I had to enlist my daughter's help with them as I was running short on time.  I learned some valuable lessons on what to do, and not do, for working with clients in the future.  I really need to let go sometimes-perfection, although nice, isn't always necessary.:)

In the end the items were completed on time and the client was happy; which is all that really mattered.

Supplies: Tissue Paper, Spray Paint, Baskets, Organza Ribbon, Wood Dowels, Wood Skewers, Wire, Floral Foam, Hot Glue Gun and glue, River Rocks (for weight)

Make it a great day!

Sunday, April 1, 2012

Blooms

The effects of the psycho weather patterns this year are starting to show in the plant life around here. Many of the early Spring flowers are already dying off, so I thought I would create some blooms that are a little more permanent.

The Blossom punch and Mixed Bunch stamp set from the Occasions Mini have been sitting in a box, unused, for over a month now. {Not for lack of wanting to use them though. :)} My niece's birthday card was a great way to break them in.

She's a girly girl and loves pink, so the soft but cheery colors in the Beau Chateau DSP made a great background for the single bloom. The card base and flower are Pink Pirouette. The sentiment is stamped in Lucky Limeade.

I used the Large Tag Punch to create the "v" in the end of the banner. Any square punch will do.

I don't know about you, but this card just makes me happy when I look at it. It reminds me of warm sunny days working in the flower garden or sipping lemonade by the pool.

Stamps: Mixed Bunch, Curly Cute
Paper: Pink Pirouette, Whisper White, Beau Chateau DSP
Ink: Pink Pirouette, Lucky Limeade
Misc.: Blossom Punch, Large Tag Punch, Designer Buttons, 1/8" Lucky Limeade Organdy Ribbon (SAB 2012), Mini Glue Dots


One of the patterns in the Beau Chateau paper has this ornate vintage frame which I thought would work as a great background to showcase the focal bloom.

To create the bloom I stamped the more ornate flower in the Mixed Bunch set three times on First Edition Specialty DSP in Pink Pirouette. After I punched them out with the Blossom Punch, I sponged the edges with Pretty in Pink and crumpled them up. Be careful when doing this, you don't want to rip your blooms.

The center is a half inch circle of Daffodil Delight. The flower is kept together with an Ice Rhinestone Brad. To add a little more texture, I used Chantilly Crochet Trim to make the "leaves". The sentiment is from the Because I Care stamp set (retired) and stamped in Marina Mist.

Stamps: Mixed Bunch, Because I Care (retired)
Paper: Daffodil Delight, Marina Mist, Pink Pirouette, Beau Chateau DSP, First Edition Specialty DSP
Ink: Marina Mist, Pinnk Pirouette, Pretty in Pink
Misc.: Blossom Punch, Ice Rhinestone Brads, Chantilly Crochet Trim, 1/2" Circle Punch, Mini Glue Dots, Sponge


For this last bloom I wanted to go a little more dramatic, so I decided to use black. I also wanted to create a 3-D project.

The little Kraft boxes are currently in the Occasions Mini catalog and are the perfect size for small gifts or little treats. A 3" x 3" gift card is the perfect compliment to the gift box.

A stylish label made with the Decorative Label Punch and Four Frames stamp set creates the perfect place to add a sentiment.

In the Mocha Morning Specialty DSP there are two designs with flocking and they give some elegance to this simple little box. Since the flocked papers are not double sided and I wanted the flower to be dimensional, I needed a way to make the white back of the paper more interesting. What I decided to do was glue two flowers back to back and create my own double sided paper.

I ran both sheets of the paper through the Big Shot using the Fun Flowers Bigz Die.


Then I glued them together and sponged the edges with black ink to cover any white.


I layered all the flowers along with Raven Lace Trim (retired) to create this elegant bloom.

Stamps:Four Frames, You're a Gem
Paper: Basic Black, Sahara Sand, Mocha Morning Specialty DSP
Ink: Basic Black, Sahara Sand
Misc.: Kraft Gift Box, Blossom Punch, Fun Flowers Bigz Die, Big Shot, Ribbon Originals (retired), Raven Lace Trim (retired), Mini Glue Dots, Multipurpose Liquid Glue, Sponge

Make it a Great day!!

Sunday, February 5, 2012

Excessive product use & an Anniversary Gift

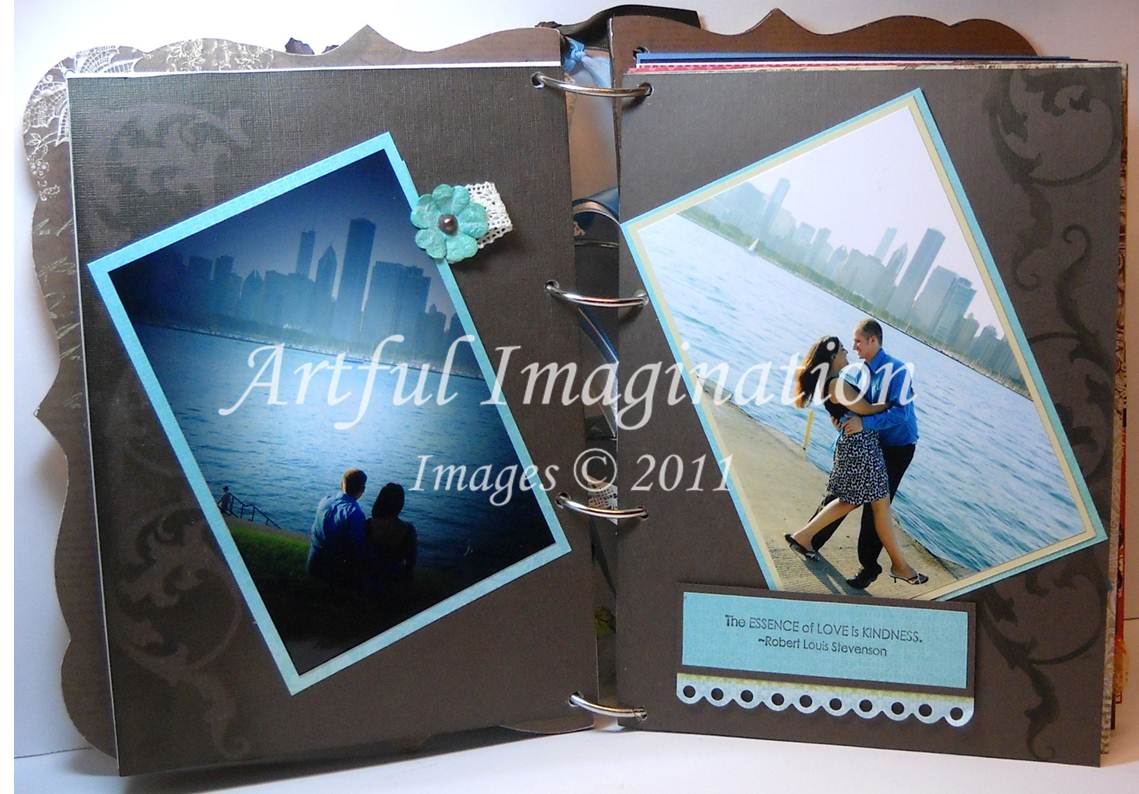
I haven't had much time or been in a creating mood lately (just a bit of creator's block), so I thought I would show you a project I made a few months ago for a classmate of mine. He wanted a special gift for his wife for their first anniversary. After seeing some of my work during a class presentation, he asked if I could make an album for her.

Traditionally, the first anniversary gift is paper, so I thought it was pretty appropriate. He gave me pictures and memorabilia from their engagement, wedding, and honeymoon, and told me cost didn't matter and I had free reign as far as design. Don't you wish all clients gave you that kind of freedom when creating? :) Although, depending on the project, it can be nice to be given some direction too.

Anyway, here is what I made:

Front Cover

I used several types of flowers to create this cover-Prima, Recollections, and Sizzix die cut. The center of the flowers are SU Basic Pearls and, Clear and Ice Rhinestone brads. The Chantilly Crochet Trim was woven in between the flowers for more depth. The word love in the book plate was printed in MS Word using a font called Angelic War.

Some of the Inside Pages
The album did not come with pre-cut inside pages, so I made my own. I wanted something heavier than just cardstock, but not as heavy as chipboard. I finally decided on heavyweight watercolor paper, which was then covered with either cardstock or DSP, as the design dictated. Before covering the watercolor paper, I placed reinforcement labels around each of the holes on both sides of the paper to help prevent ripping from wear and tear on the pages.

For the background I used a mask to add some detail to the textured cardstock. On the left hand side I sponged around the outside of the mask, and on the right I used the mask like a stencil.

To keep these gorgeous pictures as the focus, I added a hidden journaling tab behind one of them for the couple to add information later.

I used an old Coluzzle form I had to cut out the file folder. The metal photo turns keep extra pictures inside when the folder is closed. I also used a magnetic closure under the flower.


When you lift up the photo on this page, you will find a pocket for memorabilia and additional photos.

Inside Back Cover

Here is the final page and the inside back cover. The envelope was made using a Coluzzle form. Inside the envelope are once again additional pictures. I sponged the edges of the Celery satin ribbon with Marina Mist.

There are a total of 14 two page layouts in the album, plus the front and back inside pages and covers. The album was a lot of fun to make and gave me a chance to use some products and techniques that I hadn't used in a while.

Here is a list of items that I used to complete the album (aside from basic tools like scissors, paper cutters, bone folder, etc):

Stamps: Notes & Details, Essence of Love, Tiny Tags, Bliss, Enjoy Every Moment (SU) Pollen Dust (Fancy Pants)
Cardstock: Baja Breeze, Brushed Gold, Cameo Coral, Crumb Cake, Early Espresso, Marina Mist, Real Red, Basic Black, Whisper White, Very Vanilla, Vellum (SU)
DSP:
Love Letter, Patterns Series Paper Pack in Brights and Neutrals (SU) Chapter One (Kaiser Kraft) Gabrielle (BoBunny)
Ink:
Baja Breeze, Cameo Coral, Early Espresso, Marina Mist, Basic Black (SU)
Misc.: Glimmer, Metallic, Clear, Ice, and Fire Rhinestone Brads, Clip Assortment, Scallop Trim Border, Decorative Label, and Ticket Corner Punches, Crop-A-Dile, Top Note Die, Vintage Wallpaper Embossing Folder, Big Shot, Chantilly Crochet Trim, Certainly Celery and Marina Mist 5/8" Satin, Marina Mist and Early Espresso 1/8" Tafetta, Whisper White 5/8" Organza, Certainly Celery, Real Red and Marina Mist 3/8" Taffeta, and Early Espresso 1/4" Grosgrain Ribbons, Hemp Twine, Bitty Buttons, Mini Vintage Tags, Basic Pearls, Basic Rhinestones, Photo Turns (retired), Sticky Strip, Sanding Blocks, Sponges, (SU) Beyond the Page MDF Georgian Album, Chapter One Rub-Ons and Cardstock Stickers (Kaiser Kraft) Ornate Book Plate, Regal Mini Mask, (Ideology-Tim Holtz) Tattered Florals Die (Sizzix-Tim Holtz) Gabrielle brads (BoBunny) Magnetic Snaps, Precision File Set (BasicGrey) Labels #4 (Spellbinders) Essential Flowers in Moulin and Reflections, Vintage Trinkets-Flowers (Prima Flowers) Adhesive Rhinestones, Floral Embellishments, Boutique Fleur (Recollections) File Folder and Envelope Form (Coluzzle) 2" Binder Rings, Kodak Photo Paper, Reinforcement Labels (Staples) Scotch Quick Dry Adhesive (3M) Mono Adhesive (Tombow) Crystal Stickers (Mark Richards) 140Lb Watercolor Paper (Local Craft Store)

Now that is some serious product use! :) I don't think I have ever used that many products to complete a project in one shot.

How about you? What is the largest amount of products you have used to complete a project?

Have a great day!

Friday, November 25, 2011

Picture Perfect Sewing

My mom is definitely the sewer in the the family, and is wonderful at it. She made all of our clothes when we were kids, which of course, we didn't like at the time. I kind of miss that now, because everything would fit us perfectly, and it lasted so much longer. Much to her dismay, neither I nor my sister, had the desire to learn the skills of a good seamstress; the extent of my sewing is refastening buttons and doing up a hem now and then, or adding some stitching to a craft project.

I do admire those that can create beautiful garments and projects with fabric though, so this is a little homage to them and my mom.


This fabulous idea was an online extra for Papercrafts magazine a couple of months ago. I thought it would be a fun and easy project to do for the craft fairs. Stampin' Up! fabrics work great for these.

The first one I made was the middle one with the Spice Cake fabric. As you can see, it's a little puffy; I overstuffed it a bit and it was a little tough to get back in the frame. :) The rest worked out much better. Simply remove the the back and the glass, cut your fabric about an inch larger (all the way around) than the cardboard piece inside the frame, glue three sides of the fabric to the back of the cardboard, fill with batting, glue the final edge down, trim any excess fabric, and then place all the pieces (except the glass) back in the frame.

The embellishments are simply clear buttons and a little ribbon or paper. Quick, easy, and inexpensive to make. But oh so cute, don't you think?

Make today great!

Monday, October 10, 2011

Key Notes

Are you one of those people always looking for a scrap of paper to write down a reminder or telephone number and then losing it in the bottom of your purse or in the car? Me too! Well these little beauties are a great way to keep some paper handy.

They are key ring notepads! I received one from a stamping friend over the summer and thought it was the neatest idea I had seen in a while. So, I decided to make a few....80 to be exact. :) I will be selling them at some upcoming craft fairs.


The Big Shot does all the work, so you can make several of them in a short period of time. Each notepad has approximately 40-50 sheets of paper. I used one ream of standard copy paper to make all 80 notepads. I probably could have gotten about 85 of this size, but I messed up a couple of times when running through the big shot. Butterflies aren't so pretty when the tip of their wings are cut off. :( I do have enough paper left over to make some smaller notepads too, but not sure I will get to that.


Since I knew I was going to be making a large quantity of them, I used full 12 x 12 sheets for most of these. However, if you are only making a few at a time and have a pile of scraps that you keep ignoring, making these is a great way to use them up.

For the covers you want something a little stiffer than just DSP, so I used the thin cardboard sheet that comes in the DSP packages and just adhered the DSP to it before cutting. To save on paper when using 12 x 12 sheets, cut the DSP covered cardboard to a slightly larger square than your shape, then run it through the Big Shot. Do the same with your copy paper.


To continue to keep the cost down, I kept the embellishments simple. I again used scraps of paper or covered cardboard. You should keep the embellishments as flat as possible anyway so that they don't get caught on items in a purse or pocket and get ripped off. Even unadorned they look quite nice. I tried to make a few of them a little more masculine for the boys too.

The most expensive item to complete these was the o-ring. I bought mine at Staples in a pack of 16 and it works out to 26 cents per o-ring. Obviously, you can watch for sales or use coupons to get them cheaper.

I hope you are inspired to make some of these too. They would make great stocking stuffers or gifts for your children's classmates.

Kym

Saturday, September 10, 2011

For The Holidays Hop

Welcome to the inaugural blog hop for the SU Stamping Blog Hop group. A group of bloggers that are Hopping just for the fun of it. :) The theme for our first hop is All Holidays. The hop officially begins at 9:00 AM CST, if you are here early all the posts may not be active yet, so please make sure to come back and check us out at that time. If you started with my blog or find a broken link along the way, you can find the entire list of hoppers here.

If you are following along from the beginning, you should have just hopped over from Linda's blog~Pretty Inky Paper Crafts. She has some really cute projects, hope you left her some nice comments.


I picked Halloween for my first project; which is my daughter's favorite holiday. These little treat bags make great favors for your Monster Bash or the kid's classroom party. I used a Sizzix die, an embossing folder and My Digital Studio (MDS) to make this a quick and easy project.


The Fancy Favor Box die and black card stock create the base for these cute treats. I then used the Spider Web embossing folder to give it a little detail. Before taping together, I used a sponge and Whisper White craft ink to highlight the web design.

The label was created in MDS using the Pick Your Poison and Piece of Poison digital downloads. After punching the label out with the Decorative Label punch, I sponged the edges lightly in black then added the Pumpkin Pie pieces, which were also sponged, to give it some punch. The label is mounted with dimensionals.

To finish it off, I placed various candies into a baggie and tied it up with Old Olive ribbon.

Ink: Basic Black, Pumpkin Pie, Whisper White craft ink
Paper: Basic Black, Pumpkin Pie, Very Vanilla (label)
Misc.: Fancy Favor Box Sizzix Die, Spider Web Embossing Folder, Big Shot, Decorative Label Punch, MDS, Old Olive 1/4" Grosgrain ribbon, Sticky Strip, Dimensionals, Sponges


My second project is a card for my favorite holiday, Christmas. Also a quick and easy project, this card can be made in under 5 minutes but still creates a "wow" impression.


The Crumb Cake base is 6" x 6". The embossed snowflake and rhinestone give the card an elegant feel, while the Real Red and Pear Pizzazz colors give it the extra punch. The Real Red card stock is given some detail with the Scallop Trim border punch. The sentiment is from the Four the Holidays stamp set.

Stamps: Four The Holidays, Serene Snowflakes
Ink: Pear Pizzazz, Versamark
Paper: Crumb Cake, Pear Pizzazz, Real Red
Misc.: Scallop Trim border punch, Rhinestone Jewels, White Embossing Powder, Heat Gun


Thank you for stopping by and taking the time to look around my blog. I hope you enjoyed the Holiday projects shown, however, it is time to continue your journey.

The next stop on the hop is Barb's blog~The Love of Stamping! Barb is the gracious leader of our group, so please show her some appreciation with your kind comments. I'm sure she will enjoy them. :)

Make it a great day!!

Saturday, August 27, 2011

Nature Scraps

I've been making an effort lately to use some of the massive amount of scraps I have lying around. It really has gotten out of hand; the nice organized container of colored file folders has evolved into a gigantic heaping mound of paper.

I will be participating in some annual craft fairs in a couple of months and the smaller items will be a perfect way to whittle that pile down a bit.

I recently sent these items to one of my fellow VC Rockers; they were so quick and easy to make and I love how they turned out.

This is a 3" x 3" acrylic frame with a magnet on the back. The First Edition DSP was stamped with the stem image from Fabulous Florets in Wild Wasabi, and the edges sponged with Marina Mist. It was then mounted on Marina Mist card stock and simply slid into the frame.

The flower, also from Fabulous Florets, was colored with Early Espresso and Pink Pirouette markers and stamped on Pink Pirouette card stock. Once cut out, I sponged the edges with Pink Pirouette for some dimension and attached it to the front of the frame with a couple of glue dots.


I seem to be very fond of this tag combination lately, but it is just so quick to do and adds a great little accent. As you can see from other projects, like here and here, it is quite versatile too.

This time I stamped the bee from Nature Walk in Early Espresso and added a little So Saffron for just a touch of color. I hand wrote "notes" and stamped a background using one of the Tiny Tags stamps before punching it out with the Jewelry Tag Punch. Tied them on with some linen thread and done! Took me under 10 minutes to complete.

Stamps: Fabulous Florets, Nature Walk, Tiny Tags
Ink: Early Espresso, Pink Pirouette, So Saffron, Wild Wasabi
Paper: Marina Mist, Pink Pirouette, Wild Wasabi, First Edition Specialty DSP
Misc.: Mini Vintage Tags, Jewelry Tag Punch, Linen Thread, Mini Glue Dots, Dimensionals, Magnetic Acrylic Frame
, Sticky Notes pad


After making this notepad key ring for Carey, I decided to make a bunch of these for the craft fairs in all sorts of shapes and sizes. (I will be showing those in a future post.) They are an excellent way to use up those scraps! I got the idea from another fellow VC Rocker, Mary Jo, who sent one to me as a RAK.

Simply glue your patterned paper of choice to some thin cardboard, the type that comes in the DSP packages from SU works perfectly. Once dry, cut it down into smaller pieces to run through your die cut machine~I used the Big Shot and the Beautiful Butterflies die from SU. Next, just cut some plain copy paper into the same shape; I have found that about 40 sheets or so makes a nice size "notepad".

I used the Crop-A-Dile to punch the hole and then added the O ring. You could add a little decoration to them if you wanted, but I would suggest not putting too much on there as it will tend to get caught on other items and get ripped off.

Paper: Gabrielle Collection (BoBunny), Copy Paper (Staples)
Misc.: Crop-A-Dile, Big Shot, Beautiful Butterflies Bigz Die, Tombow Multi Glue, O Ring (Staples), Thin cardboard

Enjoy the Day!