Some of the great products in the Occasions Mini catalog, that just ended on April 30th, are still available for purchase!
There is no guarantee that these items will be included in the new catalog available June 1st. So, order now before they are gone.
Kym

Tuesday, May 1, 2012


Wednesday, April 25, 2012
See Ya Later Alligator....
 The retiring lists are out. Don't panic!! Stampin' Up! is making room for fabulous new products.
Yes, there are a LOT of items on these lists, but here are a few things to note:
- Classic Ink Pads are on the Accessories retiring list-They are just being reconfigured and will still be available in the new catalog (Available June 1st), however, they will be replaced with a new "firm foam pad" for a better stamping experience.
- Craft Ink Pads and refills are retiring-We will only carry the craft pads in Black and White now, so get your favorites while they last.
- There is a lot of 12 x 12 cardstock on the list. Colors that are not selling as well are being retired, we will still have 15 colors that will be sold in individual color packs. All other 12 x 12 will be sold in assorted packs.
- All 12 x 12 Textured cardstock is being retired.
- Retiring stamp sets will be available to order until May 31st.
- Retiring Accessories and Decor Elements will only be available while supplies last and they do go quick, so order early!!
If you have any questions or concerns, please contact me. I will be happy to help with any clarification needed or offer suggestions.
Kym
Monday, April 23, 2012
Crafty Red Stilettos
I love using my craft items for non-traditional projects. These are something I whipped up over the weekend. They are a gag gift for a friend. The gag is that they are for a guy. I won't bore you with the story, it wouldn't be as funny in translation. Just picture someone similar to Michael Chiklis wearing these and you should at least giggle. :)

AFTER

And here is a close-up:

The ribbons are Stamin' Up! Cherry Cobbler seam binding and Striped Riding Hood Red Grosgrain. The dangling crystals are Tim Holtz and the metal filigree piece and large rhinestone I believe are BoBunny. I was doing some cleaning of the craft room and going through a huge box of embellishments. These pieces were perfect for this project.
I attached the bows with glue dots, as I am assuming they are not actually going to be worn...
I'd break my other ankle if I tried walking around in these babies. Anyway, if you really wanted to bling out some plain shoes, even nice safe flats or wedges, I would recommend using a stronger adhesive or a clip of some kind that you can take on and off without damaging the shoe.
Just remember those craft supplies can be used for just about anything! Have fun creating!!!
Kym
BEFORE

AFTER

And here is a close-up:

The ribbons are Stamin' Up! Cherry Cobbler seam binding and Striped Riding Hood Red Grosgrain. The dangling crystals are Tim Holtz and the metal filigree piece and large rhinestone I believe are BoBunny. I was doing some cleaning of the craft room and going through a huge box of embellishments. These pieces were perfect for this project.
I attached the bows with glue dots, as I am assuming they are not actually going to be worn...
I'd break my other ankle if I tried walking around in these babies. Anyway, if you really wanted to bling out some plain shoes, even nice safe flats or wedges, I would recommend using a stronger adhesive or a clip of some kind that you can take on and off without damaging the shoe.
Just remember those craft supplies can be used for just about anything! Have fun creating!!!
Kym
Sunday, April 1, 2012
Blooms
The effects of the psycho weather patterns this year are starting to show in the plant life around here. Many of the early Spring flowers are already dying off, so I thought I would create some blooms that are a little more permanent.
The Blossom punch and Mixed Bunch stamp set from the Occasions Mini have been sitting in a box, unused, for over a month now. {Not for lack of wanting to use them though. :)} My niece's birthday card was a great way to break them in.
 She's a girly girl and loves pink, so the soft but cheery colors in the Beau Chateau DSP made a great background for the single bloom. The card base and flower are Pink Pirouette. The sentiment is stamped in Lucky Limeade.
I used the Large Tag Punch to create the "v" in the end of the banner. Any square punch will do.
I don't know about you, but this card just makes me happy when I look at it. It reminds me of warm sunny days working in the flower garden or sipping lemonade by the pool.
Stamps: Mixed Bunch, Curly Cute
Paper: Pink Pirouette, Whisper White, Beau Chateau DSP
Ink: Pink Pirouette, Lucky Limeade
Misc.: Blossom Punch, Large Tag Punch, Designer Buttons, 1/8" Lucky Limeade Organdy Ribbon (SAB 2012), Mini Glue Dots
One of the patterns in the Beau Chateau paper has this ornate vintage frame which I thought would work as a great background to showcase the focal bloom.
 To create the bloom I stamped the more ornate flower in the Mixed Bunch set three times on First Edition Specialty DSP in Pink Pirouette. After I punched them out with the Blossom Punch, I sponged the edges with Pretty in Pink and crumpled them up. Be careful when doing this, you don't want to rip your blooms.
The center is a half inch circle of Daffodil Delight. The flower is kept together with an Ice Rhinestone Brad. To add a little more texture, I used Chantilly Crochet Trim to make the "leaves". The sentiment is from the Because I Care stamp set (retired) and stamped in Marina Mist.
Stamps: Mixed Bunch, Because I Care (retired)
Paper: Daffodil Delight, Marina Mist, Pink Pirouette, Beau Chateau DSP, First Edition Specialty DSP
Ink: Marina Mist, Pinnk Pirouette, Pretty in Pink
Misc.: Blossom Punch, Ice Rhinestone Brads, Chantilly Crochet Trim, 1/2" Circle Punch, Mini Glue Dots, Sponge
For this last bloom I wanted to go a little more dramatic, so I decided to use black. I also wanted to create a 3-D project.
 The little Kraft boxes are currently in the Occasions Mini catalog and are the perfect size for small gifts or little treats. A 3" x 3" gift card is the perfect compliment to the gift box.
A stylish label made with the Decorative Label Punch and Four Frames stamp set creates the perfect place to add a sentiment.
In the Mocha Morning Specialty DSP there are two designs with flocking and they give some elegance to this simple little box. Since the flocked papers are not double sided and I wanted the flower to be dimensional, I needed a way to make the white back of the paper more interesting. What I decided to do was glue two flowers back to back and create my own double sided paper.
I ran both sheets of the paper through the Big Shot using the Fun Flowers Bigz Die.

Then I glued them together and sponged the edges with black ink to cover any white.

I layered all the flowers along with Raven Lace Trim (retired) to create this elegant bloom.
 Stamps:Four Frames, You're a Gem
Paper: Basic Black, Sahara Sand, Mocha Morning Specialty DSP
Ink: Basic Black, Sahara Sand
Misc.: Kraft Gift Box, Blossom Punch, Fun Flowers Bigz Die, Big Shot, Ribbon Originals (retired), Raven Lace Trim (retired), Mini Glue Dots, Multipurpose Liquid Glue, Sponge
Make it a Great day!!
The Blossom punch and Mixed Bunch stamp set from the Occasions Mini have been sitting in a box, unused, for over a month now. {Not for lack of wanting to use them though. :)} My niece's birthday card was a great way to break them in.
 She's a girly girl and loves pink, so the soft but cheery colors in the Beau Chateau DSP made a great background for the single bloom. The card base and flower are Pink Pirouette. The sentiment is stamped in Lucky Limeade.
I used the Large Tag Punch to create the "v" in the end of the banner. Any square punch will do.
I don't know about you, but this card just makes me happy when I look at it. It reminds me of warm sunny days working in the flower garden or sipping lemonade by the pool.
Stamps: Mixed Bunch, Curly Cute
Paper: Pink Pirouette, Whisper White, Beau Chateau DSP
Ink: Pink Pirouette, Lucky Limeade
Misc.: Blossom Punch, Large Tag Punch, Designer Buttons, 1/8" Lucky Limeade Organdy Ribbon (SAB 2012), Mini Glue Dots
One of the patterns in the Beau Chateau paper has this ornate vintage frame which I thought would work as a great background to showcase the focal bloom.
 To create the bloom I stamped the more ornate flower in the Mixed Bunch set three times on First Edition Specialty DSP in Pink Pirouette. After I punched them out with the Blossom Punch, I sponged the edges with Pretty in Pink and crumpled them up. Be careful when doing this, you don't want to rip your blooms.
The center is a half inch circle of Daffodil Delight. The flower is kept together with an Ice Rhinestone Brad. To add a little more texture, I used Chantilly Crochet Trim to make the "leaves". The sentiment is from the Because I Care stamp set (retired) and stamped in Marina Mist.
Stamps: Mixed Bunch, Because I Care (retired)
Paper: Daffodil Delight, Marina Mist, Pink Pirouette, Beau Chateau DSP, First Edition Specialty DSP
Ink: Marina Mist, Pinnk Pirouette, Pretty in Pink
Misc.: Blossom Punch, Ice Rhinestone Brads, Chantilly Crochet Trim, 1/2" Circle Punch, Mini Glue Dots, Sponge
For this last bloom I wanted to go a little more dramatic, so I decided to use black. I also wanted to create a 3-D project.
 The little Kraft boxes are currently in the Occasions Mini catalog and are the perfect size for small gifts or little treats. A 3" x 3" gift card is the perfect compliment to the gift box.
A stylish label made with the Decorative Label Punch and Four Frames stamp set creates the perfect place to add a sentiment.
In the Mocha Morning Specialty DSP there are two designs with flocking and they give some elegance to this simple little box. Since the flocked papers are not double sided and I wanted the flower to be dimensional, I needed a way to make the white back of the paper more interesting. What I decided to do was glue two flowers back to back and create my own double sided paper.
I ran both sheets of the paper through the Big Shot using the Fun Flowers Bigz Die.

Then I glued them together and sponged the edges with black ink to cover any white.

I layered all the flowers along with Raven Lace Trim (retired) to create this elegant bloom.
 Stamps:Four Frames, You're a Gem
Paper: Basic Black, Sahara Sand, Mocha Morning Specialty DSP
Ink: Basic Black, Sahara Sand
Misc.: Kraft Gift Box, Blossom Punch, Fun Flowers Bigz Die, Big Shot, Ribbon Originals (retired), Raven Lace Trim (retired), Mini Glue Dots, Multipurpose Liquid Glue, Sponge
Make it a Great day!!
Monday, March 26, 2012
Masculine Thanks
I'm finding that I am not having as difficult a time doing quick and simple cards as much as I used to. Even my daughter noticed it. When I showed her the card for this post she said, "Wow, what happened? You did a simple card!" (LOL)
I needed a thank you card for a male friend, so going with vintage, frills or collage wasn't an option anyway. I also needed to get it done quickly, which always aids in the decision to use less product.
 I adore Bonsai trees which is the main reason I bought the Plant Hope set. Having only used the palm tree in the set so far, I figured it was time to get more use out of it. I colored the Bonsai stamp with markers, misted it with water, and then stamped it on watercolor paper. I then misted the paper to get the colors to bleed a little bit.
Be careful when doing this, start with just one or two light mists to see what the colors do. You can always add more water, but there's not much you can do once the colors have all bled into a muddy blob because the paper is soaked. :)
I then layered the image on a distressed piece of soft suede. The ribbon is Pear Pizzazz seam binding with Hemp Twine layered on top of that. I only put adhesive in the middle of the image mat so that the corners and edges stayed "loose" for some added dimension. The card base is textured Early Espresso cardstock.
Stamps: Plant Hope
Ink: Early Espresso, Old Olive and Soft Suede Markers
Paper: Early Espresso Textured, Soft Suede, Watercolor Paper
Misc.: Pear Pizzazz Seam Binding, Natural Hemp Twine
Make it a great day!!
I needed a thank you card for a male friend, so going with vintage, frills or collage wasn't an option anyway. I also needed to get it done quickly, which always aids in the decision to use less product.
 I adore Bonsai trees which is the main reason I bought the Plant Hope set. Having only used the palm tree in the set so far, I figured it was time to get more use out of it. I colored the Bonsai stamp with markers, misted it with water, and then stamped it on watercolor paper. I then misted the paper to get the colors to bleed a little bit.
Be careful when doing this, start with just one or two light mists to see what the colors do. You can always add more water, but there's not much you can do once the colors have all bled into a muddy blob because the paper is soaked. :)
I then layered the image on a distressed piece of soft suede. The ribbon is Pear Pizzazz seam binding with Hemp Twine layered on top of that. I only put adhesive in the middle of the image mat so that the corners and edges stayed "loose" for some added dimension. The card base is textured Early Espresso cardstock.
Stamps: Plant Hope
Ink: Early Espresso, Old Olive and Soft Suede Markers
Paper: Early Espresso Textured, Soft Suede, Watercolor Paper
Misc.: Pear Pizzazz Seam Binding, Natural Hemp Twine
Make it a great day!!
Monday, March 19, 2012
Coming out of the dark...
So what's a girl to do when the desire to create seems to have flown the coop? Well, sometimes you just have to force yourself to make something...anything. My day job has been kind of sucking the life force out of me lately. :) Tired of giving in to the dark side, I made myself go into my studio this past weekend and play.
Here is my first attempt:

I felt kind of like a first time crafter. It's been months since I picked up any type of stamp or tool. It was fun.
I think this card looks much prettier in person. I couldn't get the Wisteria Wonder to photograph right. It's such a pretty color too. I used the set Sprinkled Expressions from the SAB catalog. Only a few days left to earn FREE product! The Luck Limeade 1/8" Organdy ribbon is also a SAB item that you can earn until March 30th. The flower was stamped in Wisteria Wonder and the sentiment in Elegant Eggplant. Once the matting was done I popped it up on dimensionals to give it a little depth.
Stamps: Sprinkled Expressions
Ink: Elegant Eggplant, Wisteria Wonder
Paper: Elegant Eggplant, Lucky Limeade, Wisteria Wonder, Whisper White, Patterns DSP Stack-Regal Collection
Misc: Clear Rhinestone Brads, Lucky Limeade 1/8" Organdy Ribbon, Dimensionals
I like my second attempt a little better...
 I really like the neutral palette of black and cream; it's so elegant looking. I stamped the First Edition DSP with the French Filigree background and then inked the edges. This was so quick and easy to put together.
The little crown stamp is from Clearly For You. I added the smallest pearls to give it a little zing. The Chantilly trim tied behind the Antique brad just added that extra little touch.
 Stamps: Clearly For You, French Filigree
Ink: Basuc Black
Paper: Basic Black, Very Vanilla, First Edition DSP
Misc.: Basic Pearls, Minit Vintage Tags, Chantilly Crochet Trim, Antique Brads, Basic Black 1 1/4" Striped Grosgrain, Sponges
Well, I hope you liked my attempts at getting my creative mojo back. Have a great day!
Kym
Here is my first attempt:

I felt kind of like a first time crafter. It's been months since I picked up any type of stamp or tool. It was fun.
I think this card looks much prettier in person. I couldn't get the Wisteria Wonder to photograph right. It's such a pretty color too. I used the set Sprinkled Expressions from the SAB catalog. Only a few days left to earn FREE product! The Luck Limeade 1/8" Organdy ribbon is also a SAB item that you can earn until March 30th. The flower was stamped in Wisteria Wonder and the sentiment in Elegant Eggplant. Once the matting was done I popped it up on dimensionals to give it a little depth.
Stamps: Sprinkled Expressions
Ink: Elegant Eggplant, Wisteria Wonder
Paper: Elegant Eggplant, Lucky Limeade, Wisteria Wonder, Whisper White, Patterns DSP Stack-Regal Collection
Misc: Clear Rhinestone Brads, Lucky Limeade 1/8" Organdy Ribbon, Dimensionals
I like my second attempt a little better...
 I really like the neutral palette of black and cream; it's so elegant looking. I stamped the First Edition DSP with the French Filigree background and then inked the edges. This was so quick and easy to put together.
The little crown stamp is from Clearly For You. I added the smallest pearls to give it a little zing. The Chantilly trim tied behind the Antique brad just added that extra little touch.
 Stamps: Clearly For You, French Filigree
Ink: Basuc Black
Paper: Basic Black, Very Vanilla, First Edition DSP
Misc.: Basic Pearls, Minit Vintage Tags, Chantilly Crochet Trim, Antique Brads, Basic Black 1 1/4" Striped Grosgrain, Sponges
Well, I hope you liked my attempts at getting my creative mojo back. Have a great day!
Kym
Sunday, February 5, 2012
Excessive product use & an Anniversary Gift
I haven't had much time or been in a creating mood lately (just a bit of creator's block), so I thought I would show you a project I made a few months ago for a classmate of mine. He wanted a special gift for his wife for their first anniversary. After seeing some of my work during a class presentation, he asked if I could make an album for her.
Traditionally, the first anniversary gift is paper, so I thought it was pretty appropriate. He gave me pictures and memorabilia from their engagement, wedding, and honeymoon, and told me cost didn't matter and I had free reign as far as design. Don't you wish all clients gave you that kind of freedom when creating? :) Although, depending on the project, it can be nice to be given some direction too.
Anyway, here is what I made:

 I used several types of flowers to create this cover-Prima, Recollections, and Sizzix die cut. The center of the flowers are SU Basic Pearls and, Clear and Ice Rhinestone brads. The Chantilly Crochet Trim was woven in between the flowers for more depth. The word love in the book plate was printed in MS Word using a font called Angelic War.
 For the background I used a mask to add some detail to the textured cardstock. On the left hand side I sponged around the outside of the mask, and on the right I used the mask like a stencil.
 To keep these gorgeous pictures as the focus, I added a hidden journaling tab behind one of them for the couple to add information later.

 I used an old Coluzzle form I had to cut out the file folder. The metal photo turns keep extra pictures inside when the folder is closed. I also used a magnetic closure under the flower.

 When you lift up the photo on this page, you will find a pocket for memorabilia and additional photos.
 Here is the final page and the inside back cover. The envelope was made using a Coluzzle form. Inside the envelope are once again additional pictures. I sponged the edges of the Celery satin ribbon with Marina Mist.
There are a total of 14 two page layouts in the album, plus the front and back inside pages and covers. The album was a lot of fun to make and gave me a chance to use some products and techniques that I hadn't used in a while.
Here is a list of items that I used to complete the album (aside from basic tools like scissors, paper cutters, bone folder, etc):
Stamps: Notes & Details, Essence of Love, Tiny Tags, Bliss, Enjoy Every Moment (SU) Pollen Dust (Fancy Pants)
Cardstock: Baja Breeze, Brushed Gold, Cameo Coral, Crumb Cake, Early Espresso, Marina Mist, Real Red, Basic Black, Whisper White, Very Vanilla, Vellum (SU)
DSP: Love Letter, Patterns Series Paper Pack in Brights and Neutrals (SU) Chapter One (Kaiser Kraft) Gabrielle (BoBunny)
Ink: Baja Breeze, Cameo Coral, Early Espresso, Marina Mist, Basic Black (SU)
Misc.: Glimmer, Metallic, Clear, Ice, and Fire Rhinestone Brads, Clip Assortment, Scallop Trim Border, Decorative Label, and Ticket Corner Punches, Crop-A-Dile, Top Note Die, Vintage Wallpaper Embossing Folder, Big Shot, Chantilly Crochet Trim, Certainly Celery and Marina Mist 5/8" Satin, Marina Mist and Early Espresso 1/8" Tafetta, Whisper White 5/8" Organza, Certainly Celery, Real Red and Marina Mist 3/8" Taffeta, and Early Espresso 1/4" Grosgrain Ribbons, Hemp Twine, Bitty Buttons, Mini Vintage Tags, Basic Pearls, Basic Rhinestones, Photo Turns (retired), Sticky Strip, Sanding Blocks, Sponges, (SU) Beyond the Page MDF Georgian Album, Chapter One Rub-Ons and Cardstock Stickers (Kaiser Kraft) Ornate Book Plate, Regal Mini Mask, (Ideology-Tim Holtz) Tattered Florals Die (Sizzix-Tim Holtz) Gabrielle brads (BoBunny) Magnetic Snaps, Precision File Set (BasicGrey) Labels #4 (Spellbinders) Essential Flowers in Moulin and Reflections, Vintage Trinkets-Flowers (Prima Flowers) Adhesive Rhinestones, Floral Embellishments, Boutique Fleur (Recollections) File Folder and Envelope Form (Coluzzle) 2" Binder Rings, Kodak Photo Paper, Reinforcement Labels (Staples) Scotch Quick Dry Adhesive (3M) Mono Adhesive (Tombow) Crystal Stickers (Mark Richards) 140Lb Watercolor Paper (Local Craft Store)
Now that is some serious product use! :) I don't think I have ever used that many products to complete a project in one shot.
How about you? What is the largest amount of products you have used to complete a project?
Have a great day!
Traditionally, the first anniversary gift is paper, so I thought it was pretty appropriate. He gave me pictures and memorabilia from their engagement, wedding, and honeymoon, and told me cost didn't matter and I had free reign as far as design. Don't you wish all clients gave you that kind of freedom when creating? :) Although, depending on the project, it can be nice to be given some direction too.
Anyway, here is what I made:
Front Cover

 I used several types of flowers to create this cover-Prima, Recollections, and Sizzix die cut. The center of the flowers are SU Basic Pearls and, Clear and Ice Rhinestone brads. The Chantilly Crochet Trim was woven in between the flowers for more depth. The word love in the book plate was printed in MS Word using a font called Angelic War.
Some of the Inside Pages
The album did not come with pre-cut inside pages, so I made my own. I wanted something heavier than just cardstock, but not as heavy as chipboard. I finally decided on heavyweight watercolor paper, which was then covered with either cardstock or DSP, as the design dictated. Before covering the watercolor paper, I placed reinforcement labels around each of the holes on both sides of the paper to help prevent ripping from wear and tear on the pages.
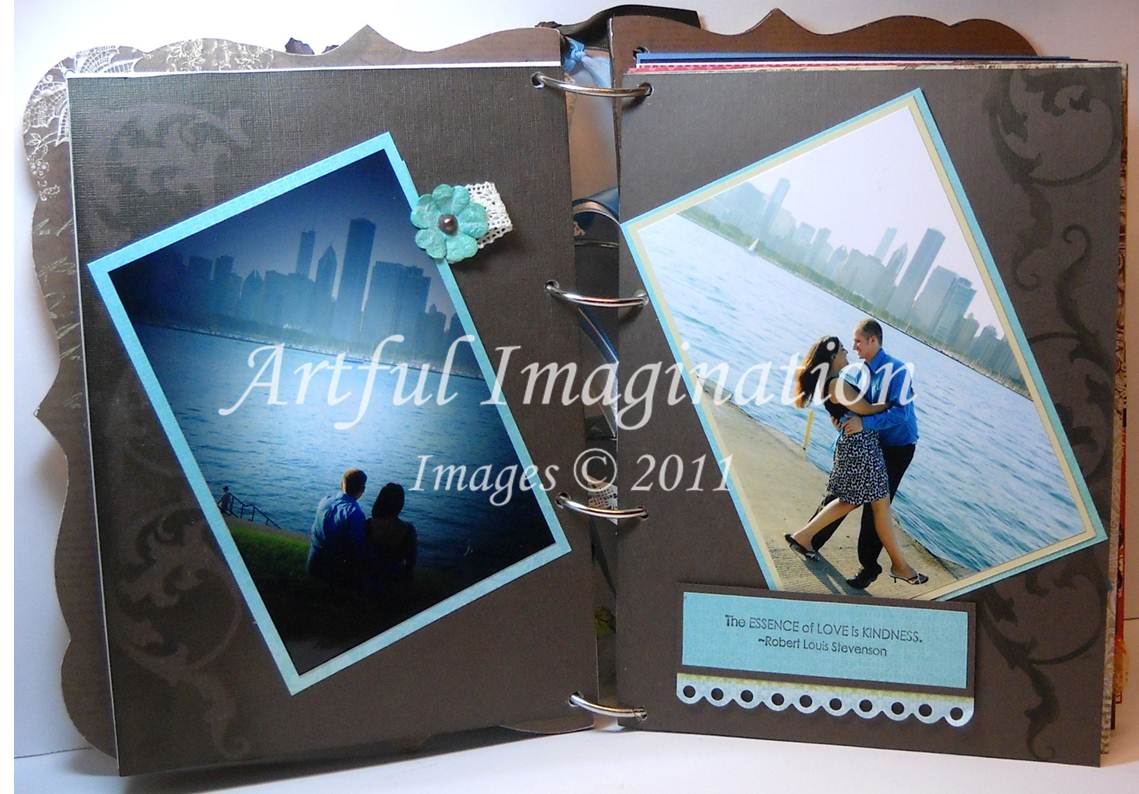 For the background I used a mask to add some detail to the textured cardstock. On the left hand side I sponged around the outside of the mask, and on the right I used the mask like a stencil.
 To keep these gorgeous pictures as the focus, I added a hidden journaling tab behind one of them for the couple to add information later.
 I used an old Coluzzle form I had to cut out the file folder. The metal photo turns keep extra pictures inside when the folder is closed. I also used a magnetic closure under the flower.
 When you lift up the photo on this page, you will find a pocket for memorabilia and additional photos.
Inside Back Cover
 Here is the final page and the inside back cover. The envelope was made using a Coluzzle form. Inside the envelope are once again additional pictures. I sponged the edges of the Celery satin ribbon with Marina Mist.
There are a total of 14 two page layouts in the album, plus the front and back inside pages and covers. The album was a lot of fun to make and gave me a chance to use some products and techniques that I hadn't used in a while.
Here is a list of items that I used to complete the album (aside from basic tools like scissors, paper cutters, bone folder, etc):
Stamps: Notes & Details, Essence of Love, Tiny Tags, Bliss, Enjoy Every Moment (SU) Pollen Dust (Fancy Pants)
Cardstock: Baja Breeze, Brushed Gold, Cameo Coral, Crumb Cake, Early Espresso, Marina Mist, Real Red, Basic Black, Whisper White, Very Vanilla, Vellum (SU)
DSP: Love Letter, Patterns Series Paper Pack in Brights and Neutrals (SU) Chapter One (Kaiser Kraft) Gabrielle (BoBunny)
Ink: Baja Breeze, Cameo Coral, Early Espresso, Marina Mist, Basic Black (SU)
Misc.: Glimmer, Metallic, Clear, Ice, and Fire Rhinestone Brads, Clip Assortment, Scallop Trim Border, Decorative Label, and Ticket Corner Punches, Crop-A-Dile, Top Note Die, Vintage Wallpaper Embossing Folder, Big Shot, Chantilly Crochet Trim, Certainly Celery and Marina Mist 5/8" Satin, Marina Mist and Early Espresso 1/8" Tafetta, Whisper White 5/8" Organza, Certainly Celery, Real Red and Marina Mist 3/8" Taffeta, and Early Espresso 1/4" Grosgrain Ribbons, Hemp Twine, Bitty Buttons, Mini Vintage Tags, Basic Pearls, Basic Rhinestones, Photo Turns (retired), Sticky Strip, Sanding Blocks, Sponges, (SU) Beyond the Page MDF Georgian Album, Chapter One Rub-Ons and Cardstock Stickers (Kaiser Kraft) Ornate Book Plate, Regal Mini Mask, (Ideology-Tim Holtz) Tattered Florals Die (Sizzix-Tim Holtz) Gabrielle brads (BoBunny) Magnetic Snaps, Precision File Set (BasicGrey) Labels #4 (Spellbinders) Essential Flowers in Moulin and Reflections, Vintage Trinkets-Flowers (Prima Flowers) Adhesive Rhinestones, Floral Embellishments, Boutique Fleur (Recollections) File Folder and Envelope Form (Coluzzle) 2" Binder Rings, Kodak Photo Paper, Reinforcement Labels (Staples) Scotch Quick Dry Adhesive (3M) Mono Adhesive (Tombow) Crystal Stickers (Mark Richards) 140Lb Watercolor Paper (Local Craft Store)
Now that is some serious product use! :) I don't think I have ever used that many products to complete a project in one shot.
How about you? What is the largest amount of products you have used to complete a project?
Have a great day!
Subscribe to:
Posts (Atom)