Pages

Thursday, December 29, 2011

Birthday Coral Sneak Peak

I hope that everyone had a wonderful Christmas! Although work was utter chaos this year, at home it was a very pleasant and relaxing Holiday for us.

Now it's time to start thinking about the new year. I've made several goals for myself for the coming year and I am determined to achieve them. One of them is to expand on a goal from 2011, and that is to continue to push myself to create things out of my comfort zone.

While the card I have to show you today is done in my favorite vintage/distressed style, the colors are definitely out of the box for me. As I have mentioned before, the orange color family is one that I typically avoid and lime green is not really at the top of my list either. However, in the upcoming Sale-A-Bration (SAB) catalog there is some very pretty vintage style DSP which features Calypso Coral and Lucky Limeade In-colors called Everyday Enchantment ~ I actually like it. :)

The paper is a wonderful mix of florals and patterns with a muted color scheme. In the close-up you can see several new items that will be available to earn FREE during SAB.


I used one of my favorite embellishments, the Mini Vintage Tag, to add some dimension and interest to the card. I stamped the tag with Lucky Limeade using one of the corners of the stamp used for the focal piece which is from the Elementary Elegance set. The birthday sentiment is also from the same set. The cute little brad and organdy ribbon are from the Everyday Enchantment Ribbon and Brad pack.

You can start earning Free SAB catalog items beginning January 24th. Come back and visit my blog for future sneak peaks and information.

Stamps: Elementary Elegance (SAB)
Ink: Calypso Coral, Crumb Cake, Lucky Limeade, Pool Party
Paper: Calypso Coral, Early Espresso, Lucky Limeade, Everyday Enchantment DSP (SAB)
Miscellaneous: Everyday Enchantment Ribbon and Brad Pack (SAB), Mini Vintage Tags, Chantilly Crochet Trim, Very Vanilla Taffeta Ribbon (retired), Curly Label, Scallop Trim Border and Scallop Edge Border Punches, Beautiful Wings Embosslit, Distress Tool (Cutter Kit), Dimensionals, Sponges


Happy New Year!!!

Sunday, December 25, 2011

Peace on Earth


Merry Christmas and Happy Holidays!


Friday, November 25, 2011

Picture Perfect Sewing

My mom is definitely the sewer in the the family, and is wonderful at it. She made all of our clothes when we were kids, which of course, we didn't like at the time. I kind of miss that now, because everything would fit us perfectly, and it lasted so much longer. Much to her dismay, neither I nor my sister, had the desire to learn the skills of a good seamstress; the extent of my sewing is refastening buttons and doing up a hem now and then, or adding some stitching to a craft project.

I do admire those that can create beautiful garments and projects with fabric though, so this is a little homage to them and my mom.


This fabulous idea was an online extra for Papercrafts magazine a couple of months ago. I thought it would be a fun and easy project to do for the craft fairs. Stampin' Up! fabrics work great for these.

The first one I made was the middle one with the Spice Cake fabric. As you can see, it's a little puffy; I overstuffed it a bit and it was a little tough to get back in the frame. :) The rest worked out much better. Simply remove the the back and the glass, cut your fabric about an inch larger (all the way around) than the cardboard piece inside the frame, glue three sides of the fabric to the back of the cardboard, fill with batting, glue the final edge down, trim any excess fabric, and then place all the pieces (except the glass) back in the frame.

The embellishments are simply clear buttons and a little ribbon or paper. Quick, easy, and inexpensive to make. But oh so cute, don't you think?

Make today great!

Thursday, November 17, 2011

Paper vs. Tech

With all the cool new gadgets out there it's not surprising that many people keep their daily lives on these little electronic marvels. But some individuals, like me, still prefer to use pen and paper for our day to day task lists: the to-do list, grocery list, gift list....

Don't get me wrong, I love getting new gadgets, but there is just something about the process of writing out the list and crossing it off when complete that works much better for me.

Each year as Christmas approached I would get a wish list from each of the children in our family. So I would invariably carry around 6 different lists, and what a nightmare if one was left at home or lost. Trying to remember which niece wanted the pink iPod, or whether the game my nephew wanted was for his DS or the PS was frustrating.

So, I created a Gift Guide that I use for members of my family and friends that I regularly buy gifts for. It's all in one spot and can be updated or added to easily.

These handy little guides let you keep track of each person's favorite color, music or author; as well, as having a place to record sizes for clothing, hobbies, or any other miscellaneous information.

I made several of these for the two craft fairs I am participating in this month. I had made them a couple of years ago and they went over very well. Hopefully they will again this year. :)

Make today great!

Monday, October 10, 2011

Key Notes

Are you one of those people always looking for a scrap of paper to write down a reminder or telephone number and then losing it in the bottom of your purse or in the car? Me too! Well these little beauties are a great way to keep some paper handy.

They are key ring notepads! I received one from a stamping friend over the summer and thought it was the neatest idea I had seen in a while. So, I decided to make a few....80 to be exact. :) I will be selling them at some upcoming craft fairs.


The Big Shot does all the work, so you can make several of them in a short period of time. Each notepad has approximately 40-50 sheets of paper. I used one ream of standard copy paper to make all 80 notepads. I probably could have gotten about 85 of this size, but I messed up a couple of times when running through the big shot. Butterflies aren't so pretty when the tip of their wings are cut off. :( I do have enough paper left over to make some smaller notepads too, but not sure I will get to that.


Since I knew I was going to be making a large quantity of them, I used full 12 x 12 sheets for most of these. However, if you are only making a few at a time and have a pile of scraps that you keep ignoring, making these is a great way to use them up.

For the covers you want something a little stiffer than just DSP, so I used the thin cardboard sheet that comes in the DSP packages and just adhered the DSP to it before cutting. To save on paper when using 12 x 12 sheets, cut the DSP covered cardboard to a slightly larger square than your shape, then run it through the Big Shot. Do the same with your copy paper.


To continue to keep the cost down, I kept the embellishments simple. I again used scraps of paper or covered cardboard. You should keep the embellishments as flat as possible anyway so that they don't get caught on items in a purse or pocket and get ripped off. Even unadorned they look quite nice. I tried to make a few of them a little more masculine for the boys too.

The most expensive item to complete these was the o-ring. I bought mine at Staples in a pack of 16 and it works out to 26 cents per o-ring. Obviously, you can watch for sales or use coupons to get them cheaper.

I hope you are inspired to make some of these too. They would make great stocking stuffers or gifts for your children's classmates.

Kym

Monday, September 19, 2011

The rush of Fall and Pumpkin Donuts

The official start of Autumn is almost here, my all time favorite season! Of course, I love all the typical things about it-the cooler weather, the beautiful colors, and all the wonderful foods coming from the garden; along with the anticipation of the festivals, craft fairs and approaching Holidays.

However, one of my most favorite things about Fall is the pumpkin donuts from our local orchard. These are not the typical donuts with the orange colored faux flavored icing you find in the grocery store or local donut shops. No, no, my friends, these are made with the real goods-pumpkins right out of their fields. They are a light airy cake style donut with a wonderfully sweet glaze. And man are they addictive!! Yum...I may need to run out to the orchard after work!

Sorry I can't share with you, but here is something sweet to feast your eyes upon:

This little beauty is made using envelopes. The majority of the supplies are from the new Spice Cake suite in the Holiday Mini. This was a lot of fun to make and pretty easy too. I have several packs of fabric from SU, but this is the first time I have actually used any of it. I will definitely be breaking into those other packs now. :)

I am planning on making several types of these for some upcoming craft fairs. I think they will make wonderful gifts for friends and family.

The "tabs" for the inserts are made from strips of the fabric.

I thought the tags would be a great place for family members and friends to write down what they are thankful for, or a special memory.

The fabulous tutorial for this mini scrapbook can be found here. Sarah's tutorial is very easy to follow. Check out some of the other free project tutorials she offers too. I will definitely be CASEing more from her. :)

Stamps: Gently Falling, Tiny Tags, Holiday Best(retired)
Paper: Spice Cake DSP, Baja Breeze, Early Espresso, More Mustard, Old Olive, Very Vanilla
Ink: Baja Breeze, Early Espresso, More Mustard, Old Olive
Misc.: Spice Cake Designer Buttons, Spice Cake Designer Fabric, Very Vanilla Envelopes, Linen Thread, Hemp Twine, Scallop circle, 2.5" circle, 1.25" circle, and Jewelry Tag punches, Baja Breeze Seam Binding, Mini Vintage Tags, Manilla tags, Retired Designer Buttons, Crop-A-Dile, Distress Tool (Cutter Kit), Sponges


Make it a great day!

Sunday, September 11, 2011

A Warm Paisley Welcome

Here is a welcome card I did for my VC Rocks roommate a while back. At first glance, this may not seem like a Quick and Easy card, but it actually is...by my standards anyway. :) There is very little stamping on the card, and using the DSP as a design element, makes it go together pretty quickly.


I embossed a piece of Soft Suede card stock (to match the base of the card) with the Vintage Wallpaper embossing folder and then sponged the edges with Soft Suede. My lightening seems to have been a bit off for these pics, as that bottom mat is actually Night of Navy.


What I really like about the Paisley Petals DSP is that there are so many colors in the patterns that the color combos are almost limitless.

Stamps: Tiny Tags, Charming Ink: Always Artichoke, Baja Breeze, Night of Navy, Soft Suede Paper: Always Artichoke, Baja Breeze, Night of Navy, Soft Suede, Paisley Petals DSP Misc.: Mini Vintage Tags, Vintage Trinkets, Marina Mist Seam Binding (retired), Chantilly Crochet Trim, Vintage Wallpaper Embossing Folder, Big Shot, Sponges


Make it a great day!

Saturday, September 10, 2011

For The Holidays Hop

Welcome to the inaugural blog hop for the SU Stamping Blog Hop group. A group of bloggers that are Hopping just for the fun of it. :) The theme for our first hop is All Holidays. The hop officially begins at 9:00 AM CST, if you are here early all the posts may not be active yet, so please make sure to come back and check us out at that time. If you started with my blog or find a broken link along the way, you can find the entire list of hoppers here.

If you are following along from the beginning, you should have just hopped over from Linda's blog~Pretty Inky Paper Crafts. She has some really cute projects, hope you left her some nice comments.


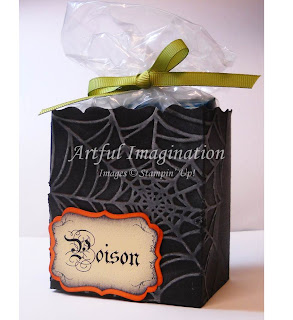
I picked Halloween for my first project; which is my daughter's favorite holiday. These little treat bags make great favors for your Monster Bash or the kid's classroom party. I used a Sizzix die, an embossing folder and My Digital Studio (MDS) to make this a quick and easy project.


The Fancy Favor Box die and black card stock create the base for these cute treats. I then used the Spider Web embossing folder to give it a little detail. Before taping together, I used a sponge and Whisper White craft ink to highlight the web design.

The label was created in MDS using the Pick Your Poison and Piece of Poison digital downloads. After punching the label out with the Decorative Label punch, I sponged the edges lightly in black then added the Pumpkin Pie pieces, which were also sponged, to give it some punch. The label is mounted with dimensionals.

To finish it off, I placed various candies into a baggie and tied it up with Old Olive ribbon.

Ink: Basic Black, Pumpkin Pie, Whisper White craft ink
Paper: Basic Black, Pumpkin Pie, Very Vanilla (label)
Misc.: Fancy Favor Box Sizzix Die, Spider Web Embossing Folder, Big Shot, Decorative Label Punch, MDS, Old Olive 1/4" Grosgrain ribbon, Sticky Strip, Dimensionals, Sponges


My second project is a card for my favorite holiday, Christmas. Also a quick and easy project, this card can be made in under 5 minutes but still creates a "wow" impression.


The Crumb Cake base is 6" x 6". The embossed snowflake and rhinestone give the card an elegant feel, while the Real Red and Pear Pizzazz colors give it the extra punch. The Real Red card stock is given some detail with the Scallop Trim border punch. The sentiment is from the Four the Holidays stamp set.

Stamps: Four The Holidays, Serene Snowflakes
Ink: Pear Pizzazz, Versamark
Paper: Crumb Cake, Pear Pizzazz, Real Red
Misc.: Scallop Trim border punch, Rhinestone Jewels, White Embossing Powder, Heat Gun


Thank you for stopping by and taking the time to look around my blog. I hope you enjoyed the Holiday projects shown, however, it is time to continue your journey.

The next stop on the hop is Barb's blog~The Love of Stamping! Barb is the gracious leader of our group, so please show her some appreciation with your kind comments. I'm sure she will enjoy them. :)

Make it a great day!!

Saturday, August 27, 2011

Nature Scraps

I've been making an effort lately to use some of the massive amount of scraps I have lying around. It really has gotten out of hand; the nice organized container of colored file folders has evolved into a gigantic heaping mound of paper.

I will be participating in some annual craft fairs in a couple of months and the smaller items will be a perfect way to whittle that pile down a bit.

I recently sent these items to one of my fellow VC Rockers; they were so quick and easy to make and I love how they turned out.

This is a 3" x 3" acrylic frame with a magnet on the back. The First Edition DSP was stamped with the stem image from Fabulous Florets in Wild Wasabi, and the edges sponged with Marina Mist. It was then mounted on Marina Mist card stock and simply slid into the frame.

The flower, also from Fabulous Florets, was colored with Early Espresso and Pink Pirouette markers and stamped on Pink Pirouette card stock. Once cut out, I sponged the edges with Pink Pirouette for some dimension and attached it to the front of the frame with a couple of glue dots.


I seem to be very fond of this tag combination lately, but it is just so quick to do and adds a great little accent. As you can see from other projects, like here and here, it is quite versatile too.

This time I stamped the bee from Nature Walk in Early Espresso and added a little So Saffron for just a touch of color. I hand wrote "notes" and stamped a background using one of the Tiny Tags stamps before punching it out with the Jewelry Tag Punch. Tied them on with some linen thread and done! Took me under 10 minutes to complete.

Stamps: Fabulous Florets, Nature Walk, Tiny Tags
Ink: Early Espresso, Pink Pirouette, So Saffron, Wild Wasabi
Paper: Marina Mist, Pink Pirouette, Wild Wasabi, First Edition Specialty DSP
Misc.: Mini Vintage Tags, Jewelry Tag Punch, Linen Thread, Mini Glue Dots, Dimensionals, Magnetic Acrylic Frame
, Sticky Notes pad


After making this notepad key ring for Carey, I decided to make a bunch of these for the craft fairs in all sorts of shapes and sizes. (I will be showing those in a future post.) They are an excellent way to use up those scraps! I got the idea from another fellow VC Rocker, Mary Jo, who sent one to me as a RAK.

Simply glue your patterned paper of choice to some thin cardboard, the type that comes in the DSP packages from SU works perfectly. Once dry, cut it down into smaller pieces to run through your die cut machine~I used the Big Shot and the Beautiful Butterflies die from SU. Next, just cut some plain copy paper into the same shape; I have found that about 40 sheets or so makes a nice size "notepad".

I used the Crop-A-Dile to punch the hole and then added the O ring. You could add a little decoration to them if you wanted, but I would suggest not putting too much on there as it will tend to get caught on other items and get ripped off.

Paper: Gabrielle Collection (BoBunny), Copy Paper (Staples)
Misc.: Crop-A-Dile, Big Shot, Beautiful Butterflies Bigz Die, Tombow Multi Glue, O Ring (Staples), Thin cardboard

Enjoy the Day!


Friday, August 26, 2011

Blog Candy Winner

Congratulations to...


Debbie M.


Random.org selected the first comment on the bold bright birthday card post. Yeah Debbie!! I will be contacting you soon.

Have a great day!!

Monday, August 22, 2011

A Rare Card

Today's post is most definitely a rare event and probably won't happen again for a long, long time...

I intentionally used bold bright colors on a project!

Yep, I did it. I broke out some of the brighter In-Colors and the new Just Add Cake DSP.

You may be aware from comments I have previously made, as well as looking at past blog posts, that bold bright colors are not my first or favorite choice. I am really trying to step outside my comfort zone once in a while though, to see how the other half lives. :)

Anyway, since I have such a difficult time with these types of colors, I figured I better get a little inspiration rather than attempting something on my own. This is my interpretation of Stampin' Up!'s sample on page 66 of the current Idea Book and Catalog.


The base of the card is the new Island Indigo; unfortunately in my picture it's not showing up as bright as it is in person.

Here is a close-up of the banner:

I am (im)patiently waiting for my order with SU's white Baker's Twine. It won't be here until Wednesday, so I used some string I had lying around. The Baker's Twine is much nicer.... Both sentiments on the card are from Bring On The Cake (which is also shown on page 66).

Stamps: Bring On The Cake
Paper: Island Indigo, Wild Wasabi, Whisper White cardstock, Just Add Cake DSP
Ink: Baja Breeze, Blushing Bride, Island Indigo, Poppy Parade, So Saffron, Wild Wasabi Markers, Basic Black classic ink pad
Misc.: Scallop Trim Border punch, Basic Rhinestone Jewels, Tag Punch, String


To make the little banner for "wishing you a wonderful day", I used my tag punch to punch out the edges. Any type of square shaped punch will do.

Place your paper into one of the corners of the punch and center it as much as possible, then just punch to get the fun little ends on your paper.


In celebration of my bold bright birthday card, I am giving away some blog candy! :)

Just leave a comment on this post by midnight Wednesday, August 24th for a chance to win one package each of SU's Basic Rhinestone Jewels and Basic Pearls.


Please let me know either your favorite color combination, or the colors that you struggle with the most. I will feature some of the combinations I receive in future posts.

I will use random.org to select a winner Thursday evening. Don't forget to leave an email that I can contact you at in case you win. If your comment is selected and I can't reach you, I will have to select someone else.

Have a great day!

Monday, August 15, 2011

What a Deal!

Time is running to stock up on your favorite Designer Series Paper packs and get a great deal at the same time!

Only two weeks left to get a FREE package of Stampin’ Up!’s® Designer Series Paper when you buy three!


You can order online Here. Get your FREE pack today!

Kym


Saturday, August 13, 2011

VC Rocks Blog Hop ~ Punches Galore

Welcome to the final blog hop weekend of the VC Rocks season. If you'd like to find out more about VC Rocks or to see how to join up for next year's fun, check out the VC Blog. You will also find all of the stops for this hop listed on the site.


If you are following along on the blog, you should have come from Diane's blog, Stampin Ldyglfr62 . She has some fabulous projects on her site.


As the caption states, the theme this round is punches. We were challenged with making projects that showcased the wonderful punches that SU offers, both past and present.

My card today is actually inspired by one of the beautiful cards that I received from my VC Roomie, Mary Jo. I changed the colors and switched out some elements to incorporate our theme of punches, but the layout is from her fabulous card.

Early Espresso, Cherry Cobbler, Baja Breeze and Soft Suede is the color theme I chose. I tried to incorporate as many punches as I could without it looking ridiculous.


The bird is stamped with Versamark on a sheet of Soft Suede from the Neutrals Patterns DSP stack and then embossed with clear embossing powder. I sponged some Cherry Cobbler on it and then punched it out using the Bird Builder Punch. The Baja Breeze piece was created with the Scallop Trim Border punch. The DSP and trim piece is popped up on dimensionals.

That wasn't enough punches for me, so I decided to create an accent piece for the card. These are the unassembled elements:

I cut the knot off the string from a Mini Vintage tag and used that to thread my button. The button "back" was created using First Edition Specialty paper which I sponged Baja Breeze onto. It was then punched out using the matching punch from the Itty Bitty Shapes punch pack and adhered to the button with Crystal Effects. Since the cord of the Mini Vintage tag is silky, I used a small drop of Crystal Effects on the knot to keep it secure on the button.

The round Mini Vintage Tag was stamped in Cherry Cobbler with an element piece from the stamp set Artistic Etchings. The same stamp was used with Baja Breeze as a background for the friends tag that was created with the Jewelry Tag punch. The friends tag and Mini Vintage tag were then tied together using Linen Thread and the button adhered with a mini glue dot.

Here is a close-up of the completed accent piece:

It was attached to the card with a Mini Library clip.

Punches: Bird Builder, Jewelry Tag, Scallop Trim Border, Itty Bitty Shapes Pack
Stamps: Fabulous Florets, Artistic Etchings, Tiny Tags. Afterthoughts (retired), Punch Potpourri (retired)
Paper: Baja Breeze, Cherry Cobbler, Early Espresso, Soft Suede, Very Vanilla, First Edition Specialty Paper, Patterns DSP Stacks-Regals (Cherry Cobbler), Neutrals (Soft Suede)
Ink: Cherry Cobbler, Early Espresso, Versamark
Misc.: Itty Bitty Buttons, Mini Vintage Tags, Mini Library Clips, Linen Thread, Crystal Effects, Mini Glue Dots, Dimensionals, Clear Embossing Powder, Heat Tool, Sponges,

Well, I hope you enjoyed my project today!

The next stop on your hopping journey is Barb's blog, The Love of Stamping. Check out her fun projects!

If you get lost along the way, find a broken link, want to start at the beginning, or just want to check out some more great projects, please visit the VC Rocks Blog.


Have a great Day!


Tuesday, August 2, 2011

Vintage Blue Butterfly

Wow, I didn't realize it had been so long since I posted. (Oops!) Well, I have been able to do some creating lately, so I will start sharing again. :)

This is a card I made for my VC Rocks roomie. I love the new BoBunny papers and had a great time creating this card.


The focal point of the card is cut from a collage sheet in the collection. The papers match wonderfully with many of the SU colors. I used Early Espresso for the card base and to ink up the edges of the papers and the chipboard sticker in the corner.

I also broke out my Twinkling H2Os that I haven't used in ages. I cut the butterfly out and highlighted the blue of its wings with Sky Blue to give it a little sparkle and then added some pearls for the body.

I also added some Sky Blue H2O highlights around the card as well to tie it all together.


Paper: Gabrielle Collection (BoBunny), Early Espresso Cardstock (SU)
Ink: Early Espresso
Misc.: Chantilly Crochet Trim, Vintage Trinkets, Linen Thread, Basic Pearls, Cutter Kit Distress Tool (SU), Chipboard Sticker (BoBunny)


Have a great day!

Friday, July 15, 2011

Little Pieces of Art

Last month I participated in an ATC swap with the VC Rocks group. Now that everyone has received their swaps, I can share them with you.

Not sure what an ATC is? ATC is short for Artist Trading Card. They are wonderful little pieces of art the size of a baseball card (2.5"x3.5").

I love ATCs! They can be used as a focal piece on a card, an embellishment on a scrapbook page, put in frames and hung as artwork, or just enjoyed on their own stored in little binders.

There were two groups in the swap, retired and current. I chose to participate in both groups. The Bloom ATC is made with all retired products. This is a pretty straight forward and easy design. I used markers to color the floral stamp from Live your Dream, then punched it out with the 1-3/8" circle punch, backing it with a Soft Sky scallop circle which is popped up with dimensionals. The Groovy Guava and DSP piece are matted on Wild Wasabi.


Stamps: Bella's Bloom, Live Your Dream
Paper: Afternoon Tea DSP, Wild Wasabi and Groovy Guava textured cardstock, Soft Sky and Whisper White smooth cardstock.
Ink: Chocolate Chip, Soft Sky, Wild Wasabi
Misc.: Scallop Circle Punch, 1-3/8" Circle Punch, Wild Wasabi stitched ribbon, Dimensionals

For the current product swap I used the palm tree from Plant Hope. For the background "scene" I took a wet paintbrush and reinkers to make the sky (Marina Mist) and desert (Soft Suede) by just swiping the brush back and forth across the piece of Naturals White cardstock.

To make it look more like a landscape, I went back in and shaded some areas with Soft Suede to make the hills. Once the tree was stamped, I again went in with the paint brush and reinker to add some shading under it. Can't have the tree just floating out there. :)

I used markers to color the stamp - Early Espresso for the trunk and a mix of Old Olive and Pear Pizzazz for the fronds. To finish it off I added some Linen Thread. The piece was matted with Paisley Petals DSP with Marina Mist cardstock as the base.

Stamps: Plant Hope
Paper: Marina Mist, Paisley Petals DSP, Naturals White
Ink: Early Espresso, Old Olive and Pear Pizzazz Markers, Marina Mist and Soft Suede Reinkers
Misc.: Linen Thread, Paint Brush, Water


Have a great day!

Wednesday, July 13, 2011

Out the door card

Most likely everyone has been in this situation at one time or another ~ a need for a card at the last minute. You know that one, the I'm walking out the door, have two minutes to make, should have been mailed days ago card. You're nodding your head right now, aren't you. :)

Well, that was me yesterday. I really needed a Thank you card, but as I was frantically searching through the tons of swaps and card samples I have there were no thank you cards. Seriously? Tons of birthday, thinking of you, and friend cards, but not one thank you.

As I am about to go into panic mode and resign myself to the fact that it is going to have to wait until this weekend (another 4 days) to get made, I see some leftover kits from the card I demoed at my upline's last meeting. Since that was a 3"x3" card, it had to be modified for mailing. This is what I came up with...


Stamps: Just Believe
Paper: Chocolate Chip DSP, Early Espresso, Not Quite Navy, Whisper White
Ink: Early Espresso
Misc: Frost White Shimmer Paint, Stampin' Pastels, Saran Wrap, Sponge Daubers, Tombow Multi Glue


Probably not the best designed card I have done, but I like it. It will serve its purpose well and I believe the recipient will also like it. The picture isn't the best, but hey, I was in a hurry people.

So the moral here for me is, to make all my leftover card kits into thank you cards. :)

Have a great day!

Sunday, July 10, 2011

Blog Hop Blog Candy Winner

And the winner of the blog candy from the VC Rocks ABC Blog Hop this past weekend is.......


Carey R. and Roscoe!

Thank you Carey for the wonderful comment:
Carey said...

Great projects Kym. I would love to win these. Your mom is definetly lucky to get these for her day.


Carey Rogers
aka Roscoe's mommy
pedstamper at sbc global dot net


I will be contacting you by email to verify where you would like the Decorated Binder Clips sent.

Thanks to EVERYONE that left a comment regarding my projects! They are all very much appreciated

Have a great day!

Kym


Saturday, July 9, 2011

VC Rocks in 3D!

For this month's VC Rocks Blog Hop the theme is "Anything But a Card". So, you will see some fabulous 3D artwork on your hopping journey this time. I am also giving away some blog candy, so when you reach the bottom of this post, check out how you can enter to win.

You should have arrived here from Eileen's blog "Stamping Fever" . Beautiful projects, weren't they? Love that bookmark.

If you get lost along the hop, come across a broken link, or just want to start at the beginning, check out the VC Rocks Blog for the entire list of participants. You will also see more fabulous creations over there as well.

For my project I made a desk set to go with the notepad holder I made my Mom for Mother's Day. To paint all the pieces in the set I used white acrylic paint mixed with Marina Mist reinker. I was attempting to match the lighter blue in the flowers and I think I got pretty darn close.


The first piece is a Desk Calendar. I printed the calendar pages in Word. The clip comes with the kit and is decorated with Seam Binding and a flower from the retired Pretties Kit tinted with Marina Mist reinker. I colored a Basic Pearl with a Sharpie for the center. If you look closely you can see the leaf stem behind the flower. It was punched in Always Artichoke with the Two-Step Bird Punch.

I painted the entire piece with my tinted paint and then covered the front with Paisley Petals DSP using Tombow multi glue to adhere it, and then placed a photo mat on the right.

Paper: Paisley Petals DSP, Always Artichoke
Ink: Marina Mist

Misc.: Basic Pearls, Always Artichoke Seam Binding, Pretties Kit (retired), Two-step Bird Punch, Mini Glue Dots, Tombow Multi Glue, Sharpie Marker, White Acrylic Paint (KaiserCraft), Beyond the Page Desk Calendar Kit (KaiserCraft)


For this memo holder I again used many of the same supplies as I did for the calendar. I love these alterable kits as they are so quick and easy to decorate. Plus they are a great way to use up your small scraps. The DSP strips on the sides are only 5/8" x 2-7/8" and the front pieces are 5/8" x 1-1/2".


Since my bird is popped up on a dimensional, I wanted to make him a little sturdier, as well as make sure he had the same pattern of DSP on both sides. After punching the first bird, I simply flipped the paper over and punched another one. That way they will match up when glued together.


Paper: Always Artichoke. Paisley Petals DSP
Ink: Marina Mist
Misc.:
Two-step Bird Punch, Tombow Multi Glue, Pretties Kit (retired), Dimensionals, White Acrylic Paint (KaiserCraft), Beyond the Page Memo Block (KaiserCraft)


The final piece, or pieces, of the set are these little binder clips. They are probably the fastest and easiest items to make and are always a big hit as gifts or as craft fair items. These are small clips, so I used a 1/2" x 1" piece of paper on either side adhered with sticky strip. Another great way to use up those small scraps.

Paper: Paisley Petals DSP
Misc.: Sticky Strip, Small Binder Clips (Staples)


Now who wants some blog candy? :) I will be giving away a set of 6 Decorated Binder Clips ~ 2 large and 4 small. Just leave a comment on this post by midnight Sunday, July 10th. I will use random.org to pick a winner on Monday. Good Luck!!

The next stop on the hop is Linda's blog, Pretty Inky Papercrafts. What a great name for a stamping blog, and she has some pretty cool projects too.


Have a great weekend!!

Kym

Monday, July 4, 2011

American Spirit

Today millions of us will celebrate the birth of our nation with cookouts and fireworks, my family included. Each year though, I like to take some time to remember why we celebrate and also all those who have fought, or are fighting, for the freedom and liberties we all to often take for granted. Thank you to you and your families for all the sacrifices you make.


There are many though who don't serve in the military, but still fight for and honor the spirit of our nation. I read a wonderful story in Parade Magazine yesterday, A Grand Old Flag. I thought Ms. Haven's family story was a great statement of the spirit and character that can still be found in many Americans today. So, for all the Ricky Haven types out there-Thank you too for your courage and strength, and for making this a wonderful country to live in.

Fun 4th of July Facts:

  • In May, 1776, after nearly a year of trying to resolve their differences with England, the colonies sent delegates to the Second Continental Congress. Finally, in June, admitting that their efforts were hopeless; a committee was formed to compose the formal Declaration of Independence. Headed by Thomas Jefferson, the committee also included John Adams, Benjamin Franklin, Philip Livingston and Roger Sherman. On June 28, 1776, Thomas Jefferson presented the first draft of the declaration to Congress.
  • Betsy Ross, according to legend, sewed the first American flag in May or June 1776, as commissioned by the Congressional Committee.
  • Independence Day was first celebrated in Philadelphia on July 8, 1776.
  • The Liberty Bell sounded from the tower of Independence Hall on July 8, 1776, summoning citizens to gather for the first public reading of the Declaration of Independence by Colonel John Nixon.
  • June 14, 1777, the Continental Congress, looking to promote national pride and unity, adopted the national flag. “Resolved: that the flag of the United States be thirteen stripes, alternate red and white; that the union be thirteen stars, white in a blue field, representing a new constellation.”
  • The word ‘patriotism’ comes from the Latin patria, which means ‘homeland’ or ‘fatherland.’
  • The first public Fourth of July event at the White House occurred in 1804.
  • Both Thomas Jefferson and John Adams died on Independence Day, July 4, 1826.
  • The 56 signers of the Declaration of Independence did not sign at the same time, nor did they sign on July 4, 1776. The official event occurred on August 2, 1776, when 50 men signed it.
  • The names of the signers of the Declaration of Independence were withheld from the public for more than six months to protect the signers. If independence had not been achieved, the treasonable act of the signers would have, by law, resulted in their deaths.
from purpletrail.com

**Happy 4th Everyone!**

Monday, June 20, 2011

Father's Day

Just a quick post today. I made this for my Dad for Father's Day. Pretty simple card and it went together pretty quickly.


The Canvas background was stamped on Soft Suede using the same ink color. I didn't want the entire piece covered with the Canvas image so I placed the stamp rubber side up, laid the piece of paper on top of it and then just applied pressure to a few areas with my fingers to pick up the image. I then crumbled it up before placing it on the card.

While I didn't intentionally set out for the sentiment to stamp unevenly, I like the way it turned out. It definitely added to the manliness of the card. :) I cut out and popped Happy and Day up on dimensionals for a little depth. The ribbon edges were lightly sponged with Early Espresso.

Stamps: All Holidays (retiring), Canvas (retired)
Ink: Always Artichoke, Early Espresso and Marina Mist Markers, Soft Suede
Paper: Always Artichoke, Early Espresso, Marina Mist, Soft Suede, Elegant Soiree DSP
Misc.: Marina Mist 5/8" Satin Ribbon, Screw Brads, Sponge, Dimensionals, Mat Pack, Paper Piercer

Have a great day!

Kym

Saturday, June 18, 2011

Winner of Flag Day Giveaway

WOW!!! So many fabulous blessings were shared; from just appreciating the everyday things we are blessed with to overcoming great hardships. Thank you all so much for visiting my blog and leaving the wonderful comments that you did. I was truly overwhelmed and excited each day to read any new comments that were posted and in some small way share in your blessings.

The winner of the Flag Day Giveaway Prize Package is...


Patricia H
Patricia H said...

Wow - you have some nice things in your giveaway!

I've been blessed with good health for myself and my family. I'm blessed to still enjoy time with my parents, who are both in their 80s. I've also been blessed with some of the bestest online friends ever. And most recently, I've been blessed with an abundance of lettuce from our garden. :)

ph_in_va (at) comcast (dot) net

Congratulations Patricia!!!!


I want to apologize for posting the winner so late today, but my Grandpa passed away this week and the funeral was today. I had actually forgotten about posting the winner until just a little bit ago. So as not to turn Patricia's win into a downer post, I would like to share some of the blessings he had during his life...

My Grandpa was blessed with 99 years of life, 73 years of which he was married to his childhood sweetheart, my Grandma. They had 7 children, 16 grandchildren, 26 great-grandchildren and 3 great-great-grandchildren. He, as well as Grandma, helped many children in need through the ministries they supported and visited throughout the U.S. and were blessed with many friends. He lived a very full and active life and had a very peaceful death-passing while he slept.

So while it is sad that he is no longer with us, his life was definitely something to celebrate!!

God Bless You Grandpa!!!

Tuesday, June 14, 2011

Flag Day Giveaway


Welcome to the 2011 Flag Day Giveaway! June 14 ~ June 17. Why a giveaway on Flag Day? Well as Holly (the wonderful organizer of this event) stated, it is a great day for Americans to reflect on the blessings we have as a nation.

When Holly first asked me about hosting a giveaway, I wasn't sure that I really wanted, or had time, to do it. Then I read her comment and realized that I have been pretty fortunate the last couple of years with a steady income, healthy family and friends, and the freedom and opportunity to run my crafting business. So why couldn't I share a few of the things I have sitting around my craft room and possibly pass some small joy on to someone else?

You can view the Master List of Flag Day Giveaways here. In case the hyperlink does not work, copy and paste the url below into your browser to get to the Master List site.

http://inkpaperstamps.com/2011/06/13/flag-day-giveaway/

So, without further ado...here is what I am giving away:

Handmade items:

Notepad Holder and matching Binder Clips
Notepad Tin
Boxed set of 5 All Occasion Cards (Blank Inside)
3 Holiday Gift Card Holders.

Inside Tin

Product (All items from Stampin' Up!):

One Package Carousel Note Cards and Envelopes
One Box of Heart Treat Cups (dozen)
One Package Jewel Basics Rhinestones
One Package 1/2" Library Clips (Chocolate Chip, Old Olive, White)
One Roll Crumb Cake Seam Binding
Afterthoughts Clear Mount Stamp Set


And here is the entire Flag Day Giveaway Package from Artful Imagination.

So how do you win this lovely package you ask? Well, simply leave a comment on this post between 8 am (CST) June 14, 2011 and Midnight (CST) June 17, 2011 letting me know what blessings you have had over the past year.

The winning poster will be chosen using random.org, but the post MUST contain a comment sharing your blessing. Big or small it does not matter, just share! The post must also contain a way to contact you. If you are the winner, I want to be able to let you know. :) If either of these items are missing from the selected post, a new post will be chosen as the winner.


Fine Print:
  1. This particular Giveaway is only open to U.S and Canada. Please check the Master List as some Hosts may be shipping Internationally.
  2. Flag Day Giveaways will officially be open from 9 am CST June 14th through June 17th to give everyone plenty of time to view all the Giveaways.
  3. Please carefully check each Blog/Etsy Shop's requirements for winning their particular Giveaway package. We were given some leeway as to how we wanted to select winners.
  4. I will contact the winner on June 18, 2011, as well as post it on my blog. The winner is responsible for supplying their shipping information to me by 10 am CST June 21, 2011, otherwise another winner will be selected.
  5. The Giveaway package will be shipped by June 21, 2011, by Priority Mail, unless another winner needs to be selected (see #4).
Good Luck Everyone!

Kym

Monday, June 13, 2011

Blog Candy Winner

I used www.random.org to choose my Blog Candy winner from this weekend's VC Rocks Big Shot Madness Blog Hop. This is the first blog candy I have ever offered, so I am really excited about this whole process.

The winner is.....


Jayne!!

Jayne posted this wonderful comment yesterday:
Jayne Stenstrom said...

Love your creations, Kym! I agree - very clever to use the die to make a bottom AND a top for the box. (Duh!)
I actually love orange and peach - and I really love your card! I think it looks great!
~Jayne
p.s. I'm also in this blog hop. It's my first ever and I'm enjoying it thoroughly. Now off to finish some work before I continue "hopping"!

June 11, 2011 1:27 PM

Thanks Jayne and I hope you enjoy the candy! :)

Kym